Showing posts with label Cross Stitch. Show all posts

Tuesday, May 1, 2018

HAED Bridge of Wings, has some progress!

Hey all, I have finally managed to get a post up about my HAED project Bridge of Wings and guess what, I finished the first row! Head on over to Pull the Other Thread for the full post.
Here is a sneak peek photo wet your appetite:

HAED Bridge of Wings Heaven and Earth Designs Cross Srtitch Work in Progress WIP

Sunday, July 23, 2017

Very First HAED Finish!

Hey everyone, I'm super excited to share todays post with you all, it's QS Clara all finished and ready for framing. Go check out the post here!! Also a little preview picture of her in all her glory.


Wednesday, July 12, 2017

Dimensions Gold Elegance of the Orient - Finished

Well guys it finally happened, I finished Elegance of the Orient. The post on this project is now up on my new blog www.pulltheotherthread.com, so go check it out HERE

Sunday, February 19, 2017

Dimensions Gold - Elegance of the Orient, Nearly There!

Hey guys, I've a new post up on my new blog. I'm very excited. Link Here

Sneak Peek of the piece:

Sneak Peek of Elegance of the Orient Progress. Click the link above to see the rest of this post, including more pictures.

Sunday, February 5, 2017

Lavender & Lace: Celtic Spring Cross Stitch Progress

Hey everyone, welcome to February, hopefully we will start seeing some nice Spring greenery soon. Speaking of Spring, in my continuing attempts to avoid working on Elegance of the Orient, last post here, I have some progress to show on my Celtic Lady! I really do feel bad that Elegance has once again been passed over, however at least I didn't start something new, that makes it ok, right?

I was looking for a project that had some nice areas of block colour and no back stitching that needed to be done immediately. I wasn't really in the mood for a HAED project, even though Bridge of Wings has some large sections of just one colour. I wanted something that made me feel like I was making tangible progress and Celtic Spring fit that requirement perfectly.


I worked on the swirls of metallic stitching, using 1 strand of the treasure braid instead of 2. I started filling in some of the gaps left from my last session with this piece and worked my way down towards the bottom of the gown. I also got to stitch the shoe, which for some reason I really like. I think it's that it really conveys she is in motion.


I also finished all the cross stitches in her bouquet and I love how it turned out. The yellow roses look so delicate. There is still some more beading to do under the flowers but I'm happy with the progress I made. I was very tempted to fill in her head piece but it's mostly beading and I wasn't in the mood for bead confetti so that will have to wait.


These pictures show the colour of the fabric I'm using quite accurately, which was an issue I was having with my other photos. It's a very delicate pink colour and the evenweave is so soft and comfortable to work with. I even find that the metallics don't shred that much with this fabric, making them much easier to use.

When I manage to get around to this project, it stitches up quite quickly. Hopefully when I start the other season ladies, I won't leave them wallow unfinished for so long.

Well that's my cross stitch project post for this week, hope you enjoyed it. Don't forget to follow me on the various social media. I pop up a sneak peep of what my post will be about on Twitter and Instagram on Fridays, so check that out to get an early clue of what's coming up.

Monday, January 23, 2017

Blossoming Spring Cross Stitch Finish

Hey all, I hope everyone is making it through January alright. As many of you know, Blogger has undergone a number of changes recently and I have found a lot of them have made the blogging experience extremely frustrating. As a result of this I will be moving my blog to a paid hosting service over the next few months. Not to worry though, I will give plenty of notice of everything that is happening and I hope you will all continue to follow along with me in my new blogging home.

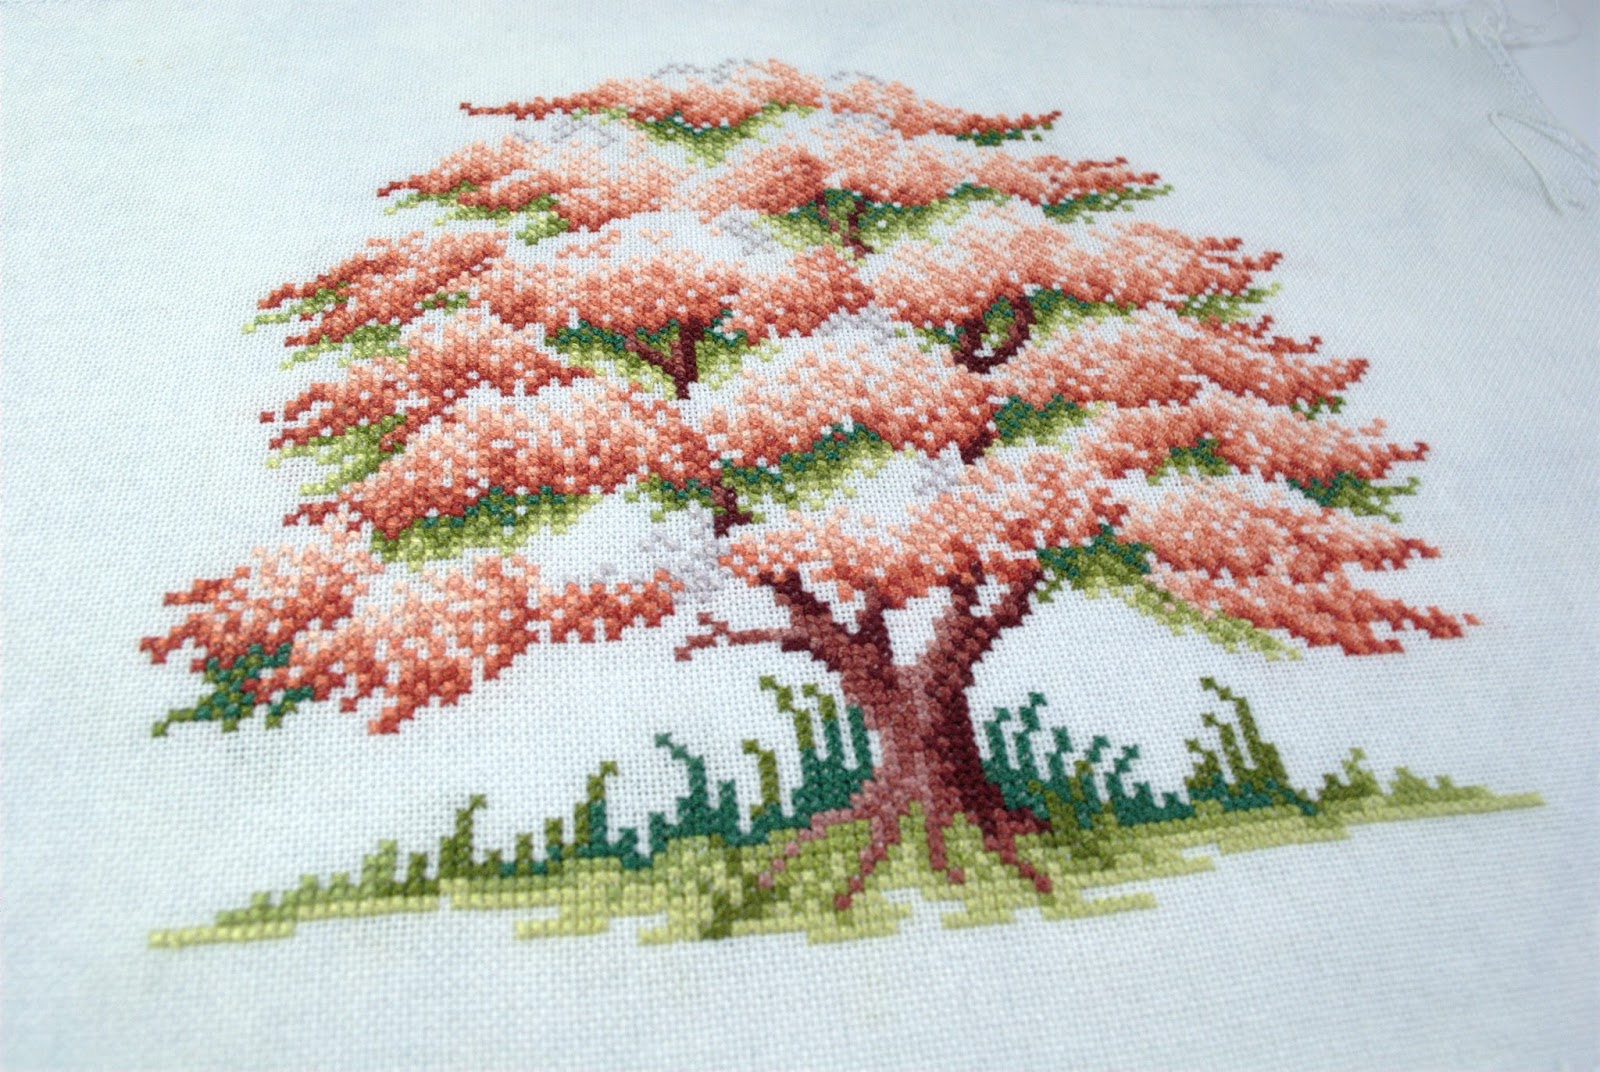
Anyway back to crafting, I'm delighted to report, I have my first cross stitch finish of 2017! I took out Blossoming Spring the other day and was shocked at how little was left to be done. I thought that there was a fair amount of stitching left on this piece. However only the top cluster of blossoms needed finishing. The last progress report on this project can be found here for those interested. 

Cross stitch finish, blossoming spring, sheila hudson, The Ultimate Forest Friends Cross Stitch Collection, stitching
Blossoming Spring - Japanese Crab Apple - Sheila Hudson

This piece was stitched on 28ct hand-dyed evenweave from Sparklies, using DMC threads 2 over 2. Usually when I stitch on hand-dyed fabric I keep the bag so that I know the name of the colourway for it, however I can't seem to find the one for this fabric and I can't remember what this is called. It's a very subtle combination of pale blues and greys.

Cross stitch finish, blossoming spring, sheila hudson, The Ultimate Forest Friends Cross Stitch Collection, stitching
Chart from 'The Ultimate Forest Friends Cross Stitch Collection'

I have really enjoyed this project, even though it has taken me over 2 years to stitch it. I actually feel pretty bad about how long this has been a WIP, because realistically I could have finished this project fairly quickly if I didn't keep jumping from piece to piece. However that's one of the things I love about being creative, matching a project to my mood.

Cross stitch finish, blossoming spring, sheila hudson, The Ultimate Forest Friends Cross Stitch Collection, stitching
Can't believe this took over 2 years *hangs head in shame*

I'm delighted to have been able to cross this project off my to-do list and I adore how it looks. It will now go with my other finishes waiting to be properly completed. I think this one will be going into a frame, if I can find one that suits. I have also been working on some more pairs of hand knit socks, see my first ones here, so they will be showing up soon. I think I may be addicted to knitting socks, have added so many patterns to my Pinterest, opps.

Well that's everything, don't forget to follow me on Instagram, Facebook and Pinterest for other stuff from me, links on the top right of the page.

Tuesday, December 20, 2016

Christmas Secret Cross Stitch Finally Unveiled

Hey everyone, well Christmas is just around the corner and I think I am pretty well prepared at this stage. Presents have been bought, decorations are up, most of my gift wrapping is done and a super special secret Christmas project is done. This is a piece I had been planning to do for most of the year and now that it has been received by the new owner I can finally share it. I am ridiculously excited to show this off.

Cross Stitch Christmas Stocking Finish, Handmade Christmas Stocking, SamSarah Designs, Just Cross Stitch Ornament,
Handmade Christmas Stocking with Cross Stitch Piece Cuff

Here it is, my handmade Christmas Stocking for a very special member of my family. The cross stitch piece is from Just Cross Stitch Ornament Edition 2014 and it's a SamSarah Designs pattern called First Star. When I saw this piece I fell in love with it, and it is perfect for this project. It is stitched on 28ct antique white evenweave using DMC threads I had in my stash, 2 over 2.

Cross Stitch Christmas Stocking Finish, Handmade Christmas Stocking, SamSarah Designs, Just Cross Stitch Ornament
First Star by SamSarah Designs - Just Cross Stitch Ornament Ed. 2014

Once the cross stitch was done I started putting the stocking together based on a template made from an old stocking of mine for size and shape. The inside of the Stocking is lined with the grey Christmas tree fabric that I used for the cuff, and there is a layer of batting between the outer layer and the lining to make it nice and squishy. I really took my time with this, carefully cutting out each piece and stitching them together. I even made a practice one out of cheap material and I am grateful I did! Based on the practice run, I decided to stitch the cuff into the sides of the stocking which made it much neater and easier to put together.

Cross Stitch Christmas Stocking Finish, Handmade Christmas Stocking, SamSarah Designs, Just Cross Stitch Ornament
Stocking nearly ready to send to its new home

I thought that putting the majority of the stocking together would be fairly straight forward but the one thing that I couldn't figure out was how to stitch the lining to the inside so it wouldn't get pulled out. Thankfully the Internet came to the rescue and I used this tutorial to put it together so the lining would stay in place.

I am so delighted with how this project looks and I really hope the recipients love it too. It was super fun to make something so different and figure out the best way to put it all together. Hopefully this will encourage me to continue trying new ways to use my sewing machine and cross stitch finishes.

I want to wish all my readers an amazing Christmas and a wonderful New Year as this is my last post before the Holidays.

Wednesday, November 30, 2016

Be Jolly Cross Stitch Finish - Mini Cushion Style

Hey there, hope those of you who celebrate Christmas are enjoying the start of the holiday season. To all my American buddies, I hope you had a great Thanksgiving. I have finally made a start on getting ready for Christmas, don't have my decorations up yet, but will sort those some time over the next few weeks. I have been doing some gift shopping, and also made a Christmas ornament finish! This is actually really exciting for me as I have no handmade Christmas decorations! I usually give away most of my pieces.

Be Jolly, Just Cross Stitch, Mini cross stitch finish, Christmas, Mini Cushion Finish, Stitching, Handmade
Be Jolly Cross Stitch finished as a mini cushion
Looking back through my blog I was fairly appalled to find that this piece was stitched in Feb 2014 and been awaiting finishing all that time. Want to see that post, it's right here! The chart is from Just Cross Stitch Ornament edition 2013, and as far as I can remember I changed all the colours to the DMC equivalents. It was stitched on a piece of 28ct evenweave fabric from a Polstitches grab bag.

Be Jolly, Just Cross Stitch, Mini cross stitch finish, Christmas, Mini Cushion Finish Preparation, Stitching, Handmade
Be Jolly Mini Cushion Prep
This ornament was a very straight forward, simple finish. I used the snowflake fabric for the backing, ran it through the sewing machine, leaving an opening for stuffing. Once I had filled it with polyester soft toy stuffing, I used an invisible ladder stitch to close it. It is a bit too large to hang from the tree so I didn't bother adding a ribbon. I will just pop it on a shelf in the house somewhere.

Be Jolly, Just Cross Stitch, Mini cross stitch finish, Christmas, Mini Cushion Finish Preparation, Stitching, Handmade
Be Jolly Cross Stitch - Just Cross Stitch Ornament Edition 2013
While I was searching my blog for the original post of this mini project, I was surprised to see how much my photographs have changed. They still aren't perfect by any means but they look a good deal better now than they used to. Don't believe me? Here is the original photo of this piece and a recent shot. What do you think? A big difference?

Old Terrible 2014 Photo
Be Jolly, Just Cross Stitch, Mini cross stitch finish, Christmas, Mini Cushion Finish, Stitching, Handmade
New Less Terrible 2016 Photo
I am currently working on another Christmas mini for a very special project, hopefully I will be able to share that with you soon.

That's all for now!

Monday, November 7, 2016

Bent Creek's Bird Seed Cross Stitch, Finished as a Cube!

Hey everyone, hope you all had a great weekend. Winter is definitely starting to settle in here, temperatures have dropped noticably and the heating is back to running regularly. I'm also making good use of my hand-knit yo-yo jumper/sweater, it's so snuggly warm, just perfect for Winter. I posted a picture of it on my Facebook page recently, click here to check it out and like my page to get updates! I will do a blog post on that in the future, as it recently got a proper photo shoot and I have have lots of lovely pictures of it.

Anyway back to todays post, I have my very first cube finish to show off. I have seen lots of this type of finish around on other blogs and just love it. I have been wanting to try one myself for a while now, so I finally took the plunge and used my Bent Creek Bird Seed finish, posted here, to try it out. I had checked out a few posts showing how to put these together in the past, so I had a good idea of what I needed to do to complete it.

Cross Stitch Finish, Cube Finish, Bent Creek Bird Seed Finish
Bent Creek Bird Seed Cross Stitch - Cube Finish

I had two styrofoam blocks I had bought some time ago in my stash. One of these was too big for this project so I used the smaller one. Unfortunately it was too deep, so I ended up cutting it in half with a bread knife. Not the easiest thing I have ever done but it worked. Next time I think I will raid my partner's toolbox and use his saw. Also I will do it outside and not in our kitchen on the chopping board!

I searched through my stash of fabrics and selected a few different ones, before I settled on a tan piece with white polkadots. I pinned the cross stitch to the styrofoam block using flat headed pins, and did the same for the backing fabric. The back of the block was uneven from being cut, so I pinned a piece of batting to the back of the cube under the fabric to even it out.

Cross Stitch Finish, Cube Finish, Bent Creek Bird Seed Finish
Cross Stitch Cube Finish - Back

I used a strip of the same tan fabric to cover the sides and top of the cube. I wanted it to go all the way around but alas I didn't have a long enough piece, so I folded in the edges at the bottom and pinned them in place. The whole thing is finished off with a wide green and narrow tan ribbon.

I'm delighted with how this turned out, it was actually a relatively simple finish. There are a few things I would change the next time I make one of these. I would add in a piece of batting to the front under the stitching, as it adds a bit of dimension to the piece. Also the stitching on the front is slightly tilted, so on the next one I will have to make sure it is straight when pinning it in place. I think it just needed to be stretched slightly to get it to sit properly.

Cross Stitch Finish, Cube Finish, Bent Creek Bird Seed Finish

I'm really looking forward to doing more of these cube finishes. The next one I have in mind is the Soda Stitch Harvest of Love, seen here, and I think I have the perfect fabric for it but will have to wait and see. Does anyone have any tips or tricks for these finishes, anything you do differently? If you haven't done one before would you like to try it out? Let me know in the comments below!

That's all for now!

Monday, October 31, 2016

A Cross Stitch Halloweeny Finish, in time for Halloween!

Hey everyone, here we are on the 31st of October, the spookiest night of the year. Hope all the Halloween preparations are done, for those who celebrate it. We will be having some friends up this evening to watch some cheesy horror movies and munch on junk food. What are your plans, spooky or otherwise? Let us know in the comments below.

Well seeing as it is Halloween I have an appropriate cross stitched ornament to show off. You might remember this from my previous post here. It's a super cute freebie from Durene Jones, and I decided I would make it into a cute hanging ornament to be the first of, hopefully, many Halloween decorations.

Durene Jones Cross Stitch, Mini cross stitch finish, Halloween, cat, stitching, handmade
Durene Jones Halloween Freebie - Available here

The first step was to look through my fabrics and pick out something for the backing that would match the cross stitch. I have a selection of 4" and 5" square pieces for quilting, I bought on Ebay just for this purpose. These small pieces are perfect for cross stitched ornaments as there is a large selection of colours and patterns included for a very reasonable price. This way I don't have to store a ridiculous amount of fabric, but still have lots to choose from for small finishes. I also have the option of stitching a few together if I need a slightly larger piece for a bigger project.

A thorough search through my collection later, and I had a combination of pieces I thought would go great with my Halloween Cat. I was torn between purples and oranges but in the end orange won the day.

Durene Jones Cross Stitch, Mini cross stitch finish, Halloween, cat, stitching, handmade
Halloween Cat Ornament Preparation

The next step was to make up the back panel using the three squares I had chosen. I calculated how large I would need each piece to be, including the seam allowance, so that it would be the right size. Off I went with rotary cutter and mat, cut the three pieces and stitched them together.

Durene Jones Cross Stitch, Mini cross stitch finish, Halloween, cat, stitching, handmade
The back panel stitched from 3 pieces of fabric

All that was left was to choose a matching ribbon. I decided to go with purple rather than orange as it gave the piece a bit of contrast. Once it had all been assembled correctly it went through the sewing machine. As is typical with me I didn't leave a very large opening to turn it the right way and stuff it with the polyester filling but I managed it, with some difficulty. I closed with an invisible ladder stitch, and I now am the proud owner of my first Halloween cross stitch decoration.

Durene Jones Cross Stitch, Mini cross stitch finish, Halloween, cat, stitching, handmade
The Finished Ornament. How Cute is that?!?

I am delighted with this and it is now hanging up above the TV. If you like this cute Halloween Cat make sure you head over to Mii's blog and check out how she finished this piece off as an awesome cube, you can find it here.

Hope everyone has a great Halloween night, enjoy and stay safe.

Tuesday, October 25, 2016

Giveaway Winner!!

Hey everyone, I hope you all had a enjoyable and creative weekend. I managed to get some finishing work done and will have a few posts on that in the future. This is a post that I have been meaning to write for a while, the lovely blogger over at Southpaw Stitcher had a giveaway a few weeks ago and I was one of the very lucky winners. Make sure you go check out her blog if you haven't before.

Awesome happy mail from Southpaw Stitcher

What a super lucky stitcher am I? I was so excited to receive this amazing package. I'm really looking forward to trying these out as they have lots of new techniques that I have not tried before. I really want to stitch the Rose Motif Sampler on some hand dyed fabric and with variegated thread, I think it would look amazing!!

These pattern booklets are quite substantial and a bit intimidating but the instructions look like they are clear and complete. I'm pretty sure I will make more than a few mistakes but that's to be expected with anything unfamiliar.

I haven't made much progress on my cross stitching WIP's but hopefully will get some more crafty time soon. In the meanwhile, have a picture of our fluffy kitty who was keeping me company during a photo session recently. I'm really happy with how this picture turned out, hopefully it's a sign my photography is improving. I just adore how bright and large his eyes came out in this.


That's all for now, see you soon.

Tuesday, October 18, 2016

My Journey to Improve My Photography - Soda Stitch Harvest of Love

Hey everyone, I hope you all had a lovely weekend and that the week is off to a very creative start.Today's post features a cross stitch finish that has appeared on my blog before. I am re-posting it because I was always unhappy with the photographs I used. In fact there are a number of finishes and WIP's which require new pictures. So the first of the re-photographed finishes I want to share is, Soda Stitch Harvest of Love.

Soda Stitch Cross Stitch Harvest of Love Finish handmade embroidery
Soda Stitch Harvest of Love - New Photo Shoot

Soda Stitch Cross Stitch Harvest of Love Finish handmade embroidery
Soda Stitch Harvest of Love - Original Photo Shoot

The first picture is from a recent photo session, the second is the original I posted. As you can see the second picture has a blue tint, which doesn't represent the piece correctly. This is because the light at the time I took the picture had a blue cast to it that came through in the photo. This probably could have been corrected if I had changed the white balance setting on my camera but alas I still haven't quite gotten the hang of that, although I am learning.

Soda Stitch Cross Stitch Harvest of Love Finish handmade embroidery
Recent Photo Shoot
Soda Stitch Cross Stitch Harvest of Love Finish handmade embroidery
Original Photo Shoot

While the original pictures give a good idea of what the finish looks like, the blue tint doesn't show the colours correctly. The new pictures are more accurate and I am much happier with the results. Seeing these photos together, I am actually fairly surprised by the difference between the old and the new. I hadn't realised how significant the blue cast was on the originals.

Soda Stitch Harvest of Love - Love that big grin!

There are lots more projects that will be re-photographed in the near future, however there are some that I don't have access to as they were gifts. Hopefully my photographs will continue to improve as I learn more about my camera, photography in general and of course get in that all important, practise!

What do you think of the new photos? Is there a big difference between them and the originals? Let me know in the comments below.

That's all for now!

Wednesday, October 12, 2016

Blossoming Spring Continues to Grow - Cross Stitch Progress

Hey everyone, hope your week is going well so far. Last weekend I got in some down time, played Dark Souls 2 for a little while, once I got it to work on my laptop & connected it to the TV, no small feat I can tell you. I also spent some time stitching away on Blossoming Spring, Elegance of the Orient unfortunately was left neglected.

Blossoming Spring Cross Stitch Work in Progress, WIP, Sheila Hudson, The Ultimate Forest Friends Collection, Cherry Blossom
Blossoming Spring - Japanese Crab Apple - Sheila Hudson

The top right cluster of blossoms was the one I had to rip out last time as it was in the wrong position, so I was delighted to get that re-stitched correctly and moved on to the other two sections of blossoms to the right. There is now one more row of flowers at the top to do, as well as some sections down the right side of the tree. You can find my previous progress post here, if you want to see the difference.

Blossoming Spring Cross Stitch Work in Progress, WIP, Sheila Hudson, The Ultimate Forest Friends Collection, Cherry Blossom
Blossoming Spring - Close Up

This has now out grown the hoop I was using and the fabric is too small a piece for any of my other frames to use comfortably. Therefore I will be finishing the rest of the stitching in hand. This isn't ideal as the fabric is hand dyed and can't be cleaned, as the dye isn't colour fast. I will have to be very careful not to get this dirty, she says as she remembers she left it sitting out on the bedside last night and it's still there uncovered!

Some of my readers will know that I am not a fan of putting frame clamps or hoops over stitching as I find it can mark or distort the stitches. Other than using a piece of felt under the Q-snaps clamps I have never found a solution for this problem, other than working as much of a chart as I can in hoop then finish off what's left in hand. Does anyone else have this problem or is it just me? I would love to know, so leave a comment below!

That's all for now guys, talk to you all soon.

Friday, October 7, 2016

Elegance of the Orient - 3 Sections Done, So Many More to Go

Hey everyone, hope you are all having an amazing and creative week so far. I'm super looking forward to the weekend and hoping to get in some crafting, relaxing and maybe some gaming (Dark Souls 2 or The Witcher 3, for those interested in such things). I may even pull out a finish or two and make some plans on what to make with them, that could be exciting.

Well onto Elegance of the Orient, I have some more progress to show. I managed to complete 3 of my small goals on this piece, the blossoms below the bird, the gold backstitching on the left side of the shawl and the same on the right. I'm pretty happy with that and plan to move onto the flowers and tree branch above her hand on the right side of the piece next.

Dimensions Gold, Elegance of the Orient, Cross Stitch, work in progress, WIP, pulltheotherthread, Oriental cross stitch
Dimensions Gold -  Elegance of the Orient Cross Stitch Work in Progress

The gold backstitching in the shawl was tricky and took longer than I expected. It uses 2 strands of metallic and 1 of cotton, which surprisingly makes it more difficult to use than just metallic on its own. I was really glad when I finished the last of those stitches. The only metallic left is in the underskirt and it uses just 2 strands of metallic rather than a mix.

Dimensions Gold, Elegance of the Orient, Cross Stitch, work in progress, WIP, pulltheotherthread, Oriental cross stitch

I also ripped back what I thought was the incorrect stitching in the branch, which I mentioned in the post here, only to realise that the blossom and rest of the branch, back to the flower cluster, is also incorrect. That has been put on the to-do list to be tackled a little later.

Dimensions Gold, Elegance of the Orient, Cross Stitch, work in progress, WIP, pulltheotherthread, Oriental cross stitch

I plan to do a post on the goal breakdown that I have started to use for this and some of my other projects. I would love to know if that would be something readers would be interested in knowing more about or not. Let me know in the comments section below.

Well that's all for now.

Tuesday, October 4, 2016

Blossoming Spring Is Not a Cherry Blossom - Opps

Hey everyone, hope you are all having a good, craft filled week so far. As the title suggests this is an update on Blossoming Spring. I was looking through the book/magazine that this chart is from the other night and noticed that this isn't actually a cherry blossom tree, it's a Japanese crab apple tree. This doesn't at all change how I feel about this project. Both cherry blossom and Japanese crab apples are stunning and this is a gorgeous chart.

Blossoming Spring Cross Stitch Work in Progress, WIP, Sheila Hudson, The Ultimate Forest Friends Collection, Cherry Blossom
Blossoming Spring - Japanese Crab Apple - Sheila Hudson

I managed some progress on the top right set of blossoms and frogged some of the grass that was incorrect, just to get it done. I actually stitched another section on this but had to frog it as it was in the wrong position. I am beginning to think that little frog has taken a permanent liking to me, either that or I need to pay more attention while stitching.

I am hoping to get the cluster I had to rip re-stitched today. Thankfully this is all full cross stitch, no partials or back stitching. I'm working on this in a hoop, which is a little small for the entire design, therefore I am leaving some of the stitching from the left hand side until the rest of the pattern is done. This is to avoid having the hoop over the existing stitches, I may even stitch those sections in hand when the time comes.

Elegance of the Orient has also grown a little, I will be posting on her later this week so keep an eye out for that. Until then, have a great week all.

Tuesday, September 27, 2016

Durene Jones Freebie Halloween Finish

Hey everyone, with Halloween time coming in fast, I have decided to share a finish I have been holding onto. This is a piece I did over a couple of days earlier this year and I thought it would be nice to wait to show it off. It is a freebie pattern by Durene Jones, whose charts I love, and is available on her Facebook page here.

Durene Jones Cross Stitch, Mini cross stitch finish, Halloween, cat, stitching, handmade
Durene Jones Halloween Freebie - Available here

This little guy is just so cute, with the witches hat and tiny little spider. It was such a fun project to work on. It is stitched on a piece of 14ct aida, just a scrap I had left over from other projects, using DMC 2 over 1. The back stitching is really straight forward so using aida was no problem and it stitched up very quickly.

Durene Jones Cross Stitch, Mini cross stitch finish, Halloween, cat, stitching, handmade
Durene Jones Mini Halloween Cross Stitch Finish.

The plan is to finish it off as an ornament of some kind and have it on display for Halloween, so there will be a post on that in the near future. Every year I mean to make some Halloween decorations but never get around to it, so this will be the first of what will, hopefully, be many Halloweeny goodies. There are lots of freebie charts on Durene's FB page that I want to stitch, as well as a number from various stitching magazines, so I'm sure you will be seeing more of her work on here.

We are really starting to see the effects of Autumn around here. The leaves are falling, the mornings are definitely cooler and the evenings are darker. I actually really like the early nights, I know quite a few people hate them but I just love that feeling of being all snuggled up at home with the darkness outside. Who else is a fan of the darker nights or Autumn/Fall season? I would love to know and also what you like about it, leave a comment below.

Well that's all for now.

Monday, September 19, 2016

Elegance of the Orient: The Saga Continues

Hey everyone, hope you are all having a fine day today. Elegance has been getting almost daily attention since my last post on her, here if you missed it. Most days I might only manage to get in 20-30 minutes but it has been slowly coming together. I'm still making a ridiculous number of mistakes on the blossoms so I keep having to stitch, rip and restitch them but I will get there eventually.

Dimensions Gold, Elegance of the Orient, Cross Stitch, work in progress, WIP, pulltheotherthread, Oriental cross stitch

By far the most difficult piece of the back stitching was the raspberry coloured plaid pattern in the underskirt. I had to do this in sections in order to keep the possibility of mistakes to a minimum. This made working on it easier but it still took quite a bit of time and I had to frog sections more than once! However I have yet to do the metallic back stitching in the shawl or yellow/pink skirt so I may end up wishing for plaid stitching when I get around to those.

Dimensions Gold, Elegance of the Orient, Cross Stitch, work in progress, WIP, pulltheotherthread, Oriental cross stitch
Close up of Plaid Back Stitching - Elegance of the Orient

In order to keep on track with this project I broke down all the sections that are left to do and put them on a to-do list. Now I work through each small section and once it's finished I get to tick it off as complete. For example, in the picture below the blossoms to the left of the bird were one item, once they were complete I ticked that off and moved to the next. This is helping to keep me motivated, as each item is a finish of sorts.

Dimensions Gold, Elegance of the Orient, Cross Stitch, work in progress, WIP, pulltheotherthread, Oriental cross stitch
Close Up - Elegance of the Orient

I would like to thank everyone who left feedback on whether I should change the incorrect threads on the top kimono flower, mentioned in my previous post on this. The overwhelming consensus was that I should leave it alone, which is what I did. You can definitely tell with the back stitching that it is different to the bottom one but I don't think it looks bad so I'm happy with that solution.
That's all from me today, happy crafting.

Bye for now!

Sunday, September 11, 2016

Never Posted this HAED Stitching Milestone!!

Every so often on lunch in work, I have a look at the WIP pictures from my blog. When I'm having an especially difficult or stressful day, I find it helps me to rebalance a bit. So while doing just that, I discovered, to my horror and shame, that my progress on QS Clara hadn't been updated! Not only that, but it was a page finish that I had neglected to share with anyone. If you're interested the last post on this project can be found HERE
HAED QS Clara Heaven and Earth Designs Heaven & Earth Designs cross stitch work in progress WIP detailed stitching
HAED - QS Clara - Hannah Lynn Disney

While I was away from the blog world I did occasionally pick up a project or two, hence the new start on Fizzy Moon. During one of these creative bouts I worked a bit on Clara and I'm really surprised that I didn't immediately hope back on my blog just to shout out loud that I had finished the last of the full pages!!

That's right folks, I have only three partial pages, two large and one small, left to fill in and she will finally be done. After finishing the last full page, I was a little tired of hair confetti so I moved to her glove, which had some larger blocks of stitching. Once the block colours were in, I filled in the rest of the glove to the black outline, which had some confetti but wasn't too taxing. Also I love filling around colour blocks, it feels like a little mini completion.
HAED QS Clara Heaven and Earth Designs Heaven & Earth Designs cross stitch work in progress WIP detailed stitching
HAED - QS Clara by Hannah Lynn Disney WIP

This project is a bit too large to fit into my small Q Snaps so I had to stop a little short of the bottom. In order to have the frame over the stitching for as short a time as possible, I plan to stitch as much as I can then fill in the last lines across the bottom.  I will continue with this page before I move across to the next rather than hoping around all over the place.

I'm not too sure when you will see Clara again as I am really eager to try and finish Elegance, so she is a focus for the moment, but who knows, maybe I will take a bit of time to put in a few more stitches if I can't stand to do anymore back stitching.

Thanks to everyone for your amazing comments and thoughts on the colour error in Elegance. Everyone said the same thing, leave it alone so that is exactly what I have decided to do. Once I have put in the backstitching I can see how it looks, if it is completely off then I may have to rethink but for now that's the plan.

Bye for Now!

Thursday, September 8, 2016

Crawling Out of the Woodwork - Elegance of the Orient

Good News Everyone! Elegance of the Orient has finally seen the light of day and gotten some long overdue attention. It's so strange that I am having such trouble with this project, when there is so little left to be done. I guess part of the problem is that I'm not the biggest fan of back stitching and there is a lot of it in this piece. This is how she looked last time I posted, a shameful 11 months ago! I honestly did not realise how neglected she was until I looked back.

Dimensions Gold Elegance of the Orient Cross Stitch Work in Progress Oriental lady kimono WIP
Dimensions Gold - Elegance of the Orient Progress

Well here she is, I finally managed to finish off the bird, a dove I'm guessing, and made some progress on the outline of her shawl and kimono. The cherry blossoms on the trees are surprisingly fiddly, as they are only half stitches and it can be difficult to anchor the thread ends. Also their placement is awkward to get right as they aren't close to the majority of the design. So I have been working on backstitching in the branches to each set of blossoms in order to make sure they are correctly placed.

Error in the branches highlighted with a black box outline

Here is where I confess all to you dear readers, I made an error in the placement of one of the branches, highlighted above. When I first discovered it I figured that I would just leave it alone and work around it but when I picked it back up again I knew that I just wouldn't be able ignore it. It's a very small fix, so I will be ripping out those offensive stitches and re-doing it correctly. I'm also pretty sure that I have done the first bit of the Raspberry coloured cording incorrectly, so that will have to be re-done.

Dimensions Gold Elegance of the Orient Cross Stitch Work in Progress Oriental lady kimono WIP
Dimensions Gold - Elegance of the Orient Cross Stitch Progress Close up

Believe it or not those are not the only mistakes in this, no wonder I'm having trouble finishing it. I discovered a long time ago that I had mixed up two of the pinks when I was sorting the threads. Luckily I discovered my error before it went too far but one of the pinks in the top rose on her kimono is wrong. I had always planned to rip them out and re-stitch them correctly before I backstitched that flower but I'm just not sure if I will. If I don't then the two flowers won't match but if I do it's going to take time as I'm not entirely sure which pink it is that's wrong. Fixing it will require lots of comparing and checking with the correctly stitched flower. I would love to hear what you guys think, rip it or leave it? 

Well that's all for now. I hope you have enjoyed seeing Elegance again after her long hiatus. Hopefully I will manage lots more progress on her and she will soon become a finish instead of a UFO.

Bye for Now!

Sunday, September 4, 2016

Fizzy Moon Finished!

Hey guys, well here I am again already and guess what....I have a finish for you all. Yes indeed I managed to get the last of the cross stitching in the flowers on Fizzy Moon completed and finished off the back stitching. He has now been ironed and photographed, so without further ado, here he is in all his cuteness.

Fizzy Moon Cross Stitch Finish, Fizzy Moon Teddy, Handmade, Hand Stitched, Cross Stitch Project, The World of Cross Stitching
Fizzy Moon Cross Stitch Finish, The World of Cross Stitching Issue 168

I am really happy with this project, the fabric just complements the piece so well and I love those beautiful purples. This was one of those occasions when I picked the chart and looking through my fabrics saw this and knew it would just be perfect. I so enjoy when that happens, all the elements just come together so easily, if only they all happened that way.

Fizzy Moon Cross Stitch Finish, Fizzy Moon Teddy, Handmade, Hand Stitched, Cross Stitch Project, The World of Cross Stitching
Fizzy Moon Cross Stitch Finsih - Close Up

I did initially have a small bit of trouble with the 2 white French knots in his eyes. It always takes me a few tries with these to remember the trick to them but once I get the first one, the rest are relatively simple. The back stitching on this, while time consuming, wasn't too troublesome due to the fabric being evenweave but I would not recommend anyone try a Fizzy Moon on Aida unless you have endless patience and fingertips like steel.

Now that this little guy is all done, he has been added to the rest of my completed pieces waiting to be used for.....something. I have no idea what it will be made into but I look forward to putting my creative brain to work on thinking something up for him. I have now moved onto Elegance of the Orient, the last post on which you can find HERE, way too long ago. I am eager to try and get this project finished as there is only the outline, detailing and some of the background blossoms left. If I can stick with it even for short periods every day I would think that I could finish it up pretty quickly.

Well that's all from me today, hope everyone is having a relaxing, creative weekend. See you guys soon.